
Proper care after tooth extraction is essential, and those first 24 hours are without a doubt the most important for a smooth recovery. Your main job is to protect the blood clot that forms in the socket. Think of it as a natural bandage that covers the underlying bone and nerves.
Your First 24 Hours After Tooth Extraction
The hours right after your procedure really set the tone for the entire healing process. You're laying the foundation for a good recovery, and your body's first move is to create a protective blood clot in the empty socket.
Everything your dentist tells you to do is designed to keep this delicate clot safe. If it gets knocked out, you could end up with a dry socket—a genuinely painful complication you want to avoid.
For a complete rundown of what to do (and what not to do), these detailed instructions for after tooth extraction are a great resource. They break down the immediate aftercare steps clearly.
To make it even simpler, here's a quick reference table for that critical first day.
Immediate Aftercare Timeline: The First 24 Hours
| Timeframe | What to Do | What to Avoid |
|---|---|---|
| First Hour | Bite firmly and consistently on the gauze pad provided. | Talking, chewing, or rinsing. |
| Hours 2-4 | Continue biting on gauze if bleeding persists. Apply ice packs (20 min on, 20 min off). | Spitting, smoking, drinking through a straw. |
| Hours 4-12 | Prioritize rest with your head elevated. Stick to soft, cool foods. | Hot liquids, alcohol, strenuous activity. |
| Hours 12-24 | Continue resting and elevating your head. Take pain medication as prescribed. | Vigorous rinsing, poking the site, hard/crunchy foods. |
Following this simple timeline helps ensure that crucial blood clot stays right where it needs to be.
Protecting The Essential Blood Clot
That blood clot is the MVP of your recovery. It shields the sensitive nerve endings in the socket and creates the framework for new tissue to grow. Without it, healing takes a lot longer and hurts a lot more.
Your goal is to create an environment where the clot can form and stay put. This means avoiding anything that creates suction or pressure in your mouth.
Here's what to steer clear of for the first 24 hours:
- No Straws: The sucking motion is notorious for pulling the clot right out of the socket.
- No Forceful Spitting: This creates a sudden pressure change that can easily dislodge the clot. Just let saliva or liquids gently fall from your mouth.
- No Smoking or Vaping: Besides the suction, the chemicals in smoke can slow down healing and raise your risk of infection.
- No Vigorous Rinsing: Hold off on mouthwash or aggressive rinsing. You can start gentle saltwater rinses after the first day.
Managing Bleeding And Swelling
It's completely normal to see a little bit of oozing or light bleeding for the first few hours. Your dentist will send you home biting on a sterile gauze pad to help apply pressure and get that clot started.
Pro Tip: If the bleeding hasn't stopped once you're home, grab a fresh piece of gauze. Fold it into a small, thick square, place it directly over the extraction site, and bite down with firm, consistent pressure for 30-45 minutes. The key here is uninterrupted pressure.
To get a handle on swelling, grab an ice pack. Apply it to the outside of your cheek for 20 minutes on, then 20 minutes off. This simple cycle is incredibly effective. It helps constrict blood vessels, which minimizes inflammation and even provides a bit of a numbing effect.
This visual breaks down the key priorities for that critical first day.
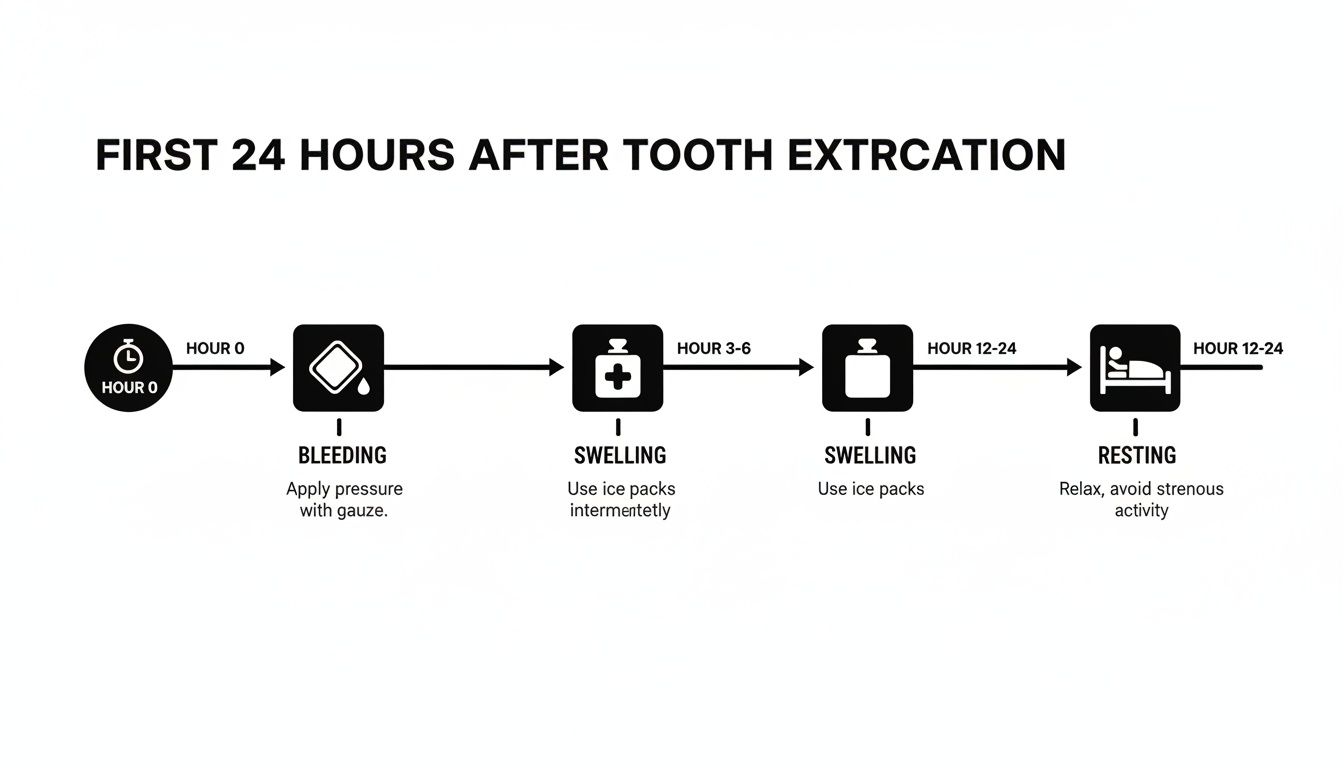
As the chart shows, your immediate focus should be controlling bleeding with gauze, then using ice packs intermittently for swelling, all while making rest your top priority.
Prioritizing Rest And Elevation
Rest is non-negotiable. Plan on taking it easy for the rest of the day after your extraction. Avoid any heavy lifting, bending over, or strenuous workouts—anything that could spike your blood pressure and cause the site to start bleeding again.
When you lie down, prop your head up with an extra pillow to keep it elevated above your heart. This simple trick does wonders for reducing swelling and that throbbing feeling.
Managing Pain and Swelling Effectively
Let’s be honest: pain and swelling are a normal part of the deal after a tooth extraction. Your body is just doing its job. But that doesn’t mean you have to be miserable. The real secret is to get ahead of the discomfort and stay there, rather than trying to play catch-up when you're already in pain.

Think of it like this: managing pain is a schedule, not a reaction. If your dentist gave you a prescription, stick to the schedule they recommended, even if you’re feeling pretty good at the moment. This proactive approach keeps the pain from ever getting a chance to build into something overwhelming.
Taming Inflammation with Cold Therapy
For the first 48 hours, an ice pack is your most valuable tool. Applying cold to the outside of your cheek, right over the extraction site, is a surprisingly powerful way to reduce swelling and gently numb the area.
The cold works by constricting the blood vessels. This simple action limits the amount of fluid that rushes to the site, which is what causes that classic post-procedure puffiness. It's a natural way to find some relief from that initial throbbing feeling.
Here’s the best way to do it:
- The 20/20 Rule: Keep the cold pack on for 20 minutes, then take it off for at least 20 minutes. This cycle is crucial. It gives your skin a chance to recover and prevents any potential tissue damage from too much cold.
- Wrap It Up: Never put ice directly on your skin. Always wrap your cold pack (or a bag of frozen peas, which works great) in a thin dish towel to create a safe barrier.
- Consistency is Key: Repeat this on-and-off cycle as often as you can during the first two days. The more consistent you are, the better your results will be.
Swelling often peaks around the second or third day post-extraction. Don't be alarmed if you feel a bit more swollen the day after your procedure—that's a completely normal part of the healing process.
By sticking with cold therapy, you can seriously lessen the peak of that swelling and keep your discomfort in check.
Using Medication Wisely
Whether you’re taking an over-the-counter anti-inflammatory like ibuprofen or something prescribed by your dentist, timing is everything. It is so much easier to keep pain at a low, dull hum than it is to wrestle it back down after it’s become severe.
Think of your pain level like a small campfire. A small fire is easy to manage. But if you ignore it and let it become a bonfire, it’s a whole different battle. Taking your medication on schedule keeps that fire small and manageable.
A Practical Medication Schedule Example
| Time | Action | Notes |
|---|---|---|
| 8:00 AM | Take prescribed dose with a bit of soft food (like yogurt or applesauce). | Eating a little something first can help prevent an upset stomach. |
| 12:00 PM | Take the next scheduled dose as your dentist directed. | I always suggest setting an alarm on your phone so you don't miss it. |
| 4:00 PM | Continue with your scheduled dose, even if you feel okay. | Remember, the goal is to stay ahead of the pain. |
| 8:00 PM | Take your final dose for the day before getting ready for bed. | This can make a huge difference in getting a more restful night's sleep. |
Switching to Warm Compresses
Once you’ve passed the 48-hour mark, it’s time to change tactics. The initial need to control swelling with cold is over. Now, the goal shifts to promoting healing and easing any jaw stiffness. This is where a warm compress comes in.
Applying a warm, moist towel to the same area helps increase blood circulation. Better circulation brings more oxygen and nutrients to the site, which speeds up your body’s natural repair work. It's also fantastic for relaxing a sore, stiff jaw that doesn't want to open easily.
Just like with the ice, apply the warm compress for about 20 minutes at a time. Start doing this on day three and repeat it several times throughout the day. This simple switch from cold to warm works in perfect harmony with your body’s healing timeline.
Your Healing Diet and Activity Guide
How you eat and move in the days following a tooth extraction has a massive impact on your healing. Making the right choices gives your body the fuel it needs to repair itself, while a misstep can easily derail your recovery. This is your practical, no-nonsense guide to getting nutrition and activity right.
Think of your body as a dedicated construction crew working to patch up the extraction site. Nutrient-rich foods are the high-quality building materials, and strenuous activity is like a sudden earthquake rattling the whole project. Your job is to supply the good stuff and keep things calm.
Fueling Your Body for a Smooth Recovery
The old advice to "just eat soft foods" is a decent starting point, but we can do better. Your goal is to find foods that are easy to eat, won't irritate the fresh wound, and are packed with the vitamins and minerals that promote healing. Yes, your diet will be a little limited for the first few days, but it definitely doesn't have to be bland.
Here are some excellent choices that go way beyond a simple bowl of ice cream:
- Nutrient-Packed Smoothies: Blend soft fruits like bananas and berries with a scoop of Greek yogurt or protein powder to create a complete, easy-to-consume meal. Just remember—and this is critical—absolutely no straws. Using a straw creates suction that can dislodge the protective blood clot. Use a spoon instead.
- Lukewarm Soups: Creamy tomato, butternut squash, or any blended vegetable soup is perfect. You want to avoid anything too hot, as heat can increase bleeding. Also, skip soups with chunky bits that could get lodged in the empty socket.
- Gentle Proteins: Scrambled eggs, cottage cheese, Greek yogurt, and even tender, flaky fish are fantastic sources of protein, which is absolutely essential for tissue repair.
- Mashed Veggies: Mashed potatoes and sweet potatoes are classics for good reason. You can also mash up avocado, carrots, or peas to get a wider range of vitamins.
And don't forget hydration. Water is your best friend. Staying well-hydrated helps your system flush out toxins and keeps your tissues healthy and ready to heal.
Crucial Reminder: Steer clear of alcohol, carbonated beverages, and caffeine for at least the first 48-72 hours. Alcohol can interfere with your medication and slow down healing, while the fizz from soda can easily disrupt the blood clot.
Understanding Your Activity Restrictions
Rest isn't just a suggestion; it's a non-negotiable part of your recovery. For the first 24-48 hours, your main job is to take it easy. That means no gym sessions, no lifting heavy groceries, and no tackling strenuous chores around the house.
Why is this so important? Any activity that gets your heart pumping also raises your blood pressure. That surge in pressure can be all it takes to make the fragile extraction site start bleeding again. Even something as simple as bending over to tie your shoes or picking up a heavy package can create enough pressure in your head to cause a problem.
A Realistic Timeline for Getting Back to Normal
This table is a general guide. If you had a more complicated surgical extraction, your dentist will give you a more specific schedule. The most important thing is to listen to your body. If you feel any throbbing or new discomfort when you start moving around, that’s your body's signal to stop and rest.
| Activity Level | When to Resume | Rationale |
|---|---|---|
| Light Activity | Days 2-3 | You can typically get back to things like walking or desk work. |
| Moderate Exercise | Days 3-5 | Ease back into activities like jogging or yoga, paying close attention to how you feel. |
| Strenuous Activity | Days 7-10 | Hold off for at least a week before returning to heavy lifting or intense cardio. |
How to Spot Complications Like Dry Socket
For the most part, recovering from a tooth extraction is a pretty smooth process. But knowing the difference between what’s normal and what’s a red flag can give you incredible peace of mind. Let’s walk through the warning signs so you can feel confident and in control of your healing.

A little discomfort is part of the deal, but some symptoms are your body’s way of saying, “Hey, call the dentist.” Being able to tell them apart is the secret to a stress-free recovery.
Demystifying Dry Socket
The complication everyone’s heard of is dry socket, or what we call alveolar osteitis. It’s exactly what it sounds like: the protective blood clot that forms in the socket gets knocked out or dissolves before it’s supposed to. This leaves the bone and nerve endings underneath exposed to everything—air, food, liquids. It’s not a good time.
This isn’t just a minor setback; it’s a deep, significant pain that your usual pain meds won’t touch. Dry socket is probably the most dreaded complication, affecting 2-5% of all extractions, but that number jumps to a startling 20-30% for lower wisdom teeth.
A tell-tale sign of dry socket is pain that gets much worse around day three or four, right when you thought you were turning a corner. The pain is often a deep, throbbing ache that can radiate up toward your ear or eye on that side of your face.
For a deeper dive into prevention, these top recovery tips for avoiding dry socket offer some great, practical advice. The main symptoms to keep an eye out for are:
- Severe, throbbing pain that doesn't get better with the medication you were given.
- A visibly empty-looking socket. Instead of a dark clot, you might see the whitish color of bone.
- A persistent foul taste or bad breath that you can't get rid of.
- Pain radiating from the socket into your jaw, ear, or temple.
If you think you have a dry socket, don't just try to power through it. Your dentist can gently clean the area and place a special medicated dressing that brings almost immediate relief and helps the site heal correctly.
Recognizing the Signs of an Infection
An infection is less common than dry socket but more serious, and it definitely needs a professional’s attention right away. It's normal to have a bit of swelling and maybe even a low-grade fever for the first day or two. An infection, however, shows up with symptoms that get progressively worse, not better.
While normal swelling usually peaks around day two or three and then starts to go down, swelling from an infection just keeps getting bigger. You might also notice that persistent bad taste again, even after rinsing.
Key Infection Warning Signs
- Increasing Swelling: The swelling around the site gets worse after the third day.
- Persistent Fever: A fever that hangs on or even develops a few days after your procedure.
- Pus or Discharge: Any yellow or white fluid coming from the extraction site is a clear warning.
- Worsening Pain: If your pain was improving and then suddenly gets severe again, that's a red flag.
If any of these signs appear, it’s crucial to call your dentist immediately. An untreated infection has the potential to spread and cause much bigger problems. Today, clinicians can use advanced tools to pinpoint bacterial issues; our article on how a https://specialtywoundcare.com/point-of-care-wound-imaging-device-detects-the-presence-and-location-of-elevated-bacterial/ explains how this technology works.
When to Make the Call
When in doubt, always err on the side of caution. Your dental team would much rather you call with a question than have you wait while a problem gets worse. Never feel like you're bothering them if something just doesn't feel right.
Get in touch with your dentist or oral surgeon if you experience any of the following:
- Bleeding you can't control, like soaking through a new gauze pad in less than an hour.
- Pain that becomes severe and isn't managed by your medication.
- Swelling that is still getting worse after 72 hours.
- Any signs you might be having an allergic reaction to your medication, like a rash, hives, or trouble breathing.
Trust your gut. You know your body better than anyone, and being proactive is the best way to make sure your recovery is a complete success.
When a Simple Extraction Becomes a Complex Wound
For most people, the site of a tooth extraction heals without much fanfare. But what happens when that predictable healing process goes off the rails? Sometimes, what should be a straightforward recovery stalls out, turning the extraction site into a chronic, non-healing wound. This is especially true for individuals with certain underlying health conditions.
This isn't just about lingering discomfort. It’s a clear signal that the body’s natural repair systems are struggling. Think of it like a diabetic foot ulcer that resists healing due to poor circulation—an oral wound can face the very same obstacles. In these cases, standard aftercare instructions just aren't going to cut it.
Why Some Wounds Refuse to Heal
When your body can't mount an effective healing response, the reasons are often systemic. Several factors can throw a wrench into the intricate process of tissue regeneration, turning a simple extraction into a complex medical problem.
Underlying health issues are frequently the culprit. They create an environment where the body's repair mechanisms are fundamentally compromised.
- Diabetes: Uncontrolled blood sugar is a major roadblock. It impairs circulation and weakens the immune system, making it much harder for the body to fight off bacteria and rebuild tissue.
- Circulatory Issues: Without robust blood flow, the wound site is starved of the oxygen and nutrients it desperately needs to heal properly.
- Autoimmune Disorders: Conditions that cause the immune system to misfire can disrupt the normal inflammatory and repair phases of healing.
- Anticoagulant Therapy: While medically necessary for many, blood thinners can complicate the very first step of healing: forming a stable blood clot.
The connection between what happens in your mouth and your overall health is profound. In fact, U.S. studies have revealed that individuals with six or more teeth removed face a 91% higher prevalence of self-reported chronic diseases. The consequences of tooth loss truly extend far beyond the jawline.
Beyond Standard Dental Aftercare
When an extraction site simply won't heal, it demands a completely different approach. This is no longer a routine dental follow-up; it's a specialized wound management problem. Advanced interventions are needed to provide the support your body requires to finally close the wound.
These treatments are designed to tackle the specific biological roadblocks that are preventing recovery. You won't typically find them in a standard dental office, but they are essential for managing complex wounds, whether they're in the mouth or anywhere else on the body.
To a wound specialist, a non-healing tooth socket is viewed through the same lens as any other chronic wound. The core principles are identical: control the bacteria, manage inflammation, and give new, healthy tissue a framework to grow on.
This is exactly where modern regenerative medicine provides powerful solutions.
Introducing Advanced Wound Interventions
One of the most effective tools we have for these challenging situations is an amniotic membrane allograft. The easiest way to think of it is as a biological bandage or a natural scaffold. When placed over the wound, it provides a rich matrix of growth factors that signal your own cells to start the rebuilding process. It protects the site while actively encouraging the regeneration of healthy gum and bone tissue.
Of course, pinpointing the exact cause of the problem is key. We can use advanced diagnostic tools like fluorescence imaging to see, in real-time, precisely where harmful bacteria are concentrated in the wound. This isn't a guess; it's a precise map of the infection. This allows for incredibly targeted cleaning (debridement), removing the bacterial barriers that were stopping the healing in its tracks.
By combining these innovative technologies, wound care specialists can overcome challenges that standard care simply can't address. For anyone facing a difficult recovery, exploring these advanced wound treatment options can be the key to achieving complete and lasting healing.
Common Questions About Tooth Extraction Recovery
Once you're home after an extraction, a lot of questions can pop up. Even when your dentist explains everything, it’s easy to second-guess yourself and wonder if what you're feeling is normal. This is your go-to guide for those moments, with straightforward answers to the most common concerns.
My goal here is to give you the confidence to get through your recovery without unnecessary worry. Knowing what to expect—and what’s a red flag—is the best tool you have for a smooth, uneventful healing process.
How Long Does the Pain Last After a Tooth Extraction?
This is usually the number one question on everyone’s mind. For a simple extraction, the worst of the discomfort is typically within the first 48 to 72 hours. After that initial peak, you should feel a steady improvement each day.
For most people, over-the-counter pain relievers like ibuprofen are all that's needed to take the edge off. But if you had a more complex surgical extraction, like impacted wisdom teeth, you might be looking at soreness that lasts closer to a week.
Here’s the most important thing to watch: the direction the pain is going. If you were feeling better and then, around day three or four, the pain suddenly gets worse, that's a signal to pay attention. Severe, throbbing pain that isn't touched by your medication is a classic sign of a dry socket, and you need to call your dentist.
When Can I Brush My Teeth Normally Again?
Keeping your mouth clean is absolutely critical, but you have to be delicate. You can and should brush your other teeth the very night of your surgery, just be incredibly careful to stay away from the extraction site. And when you’re done, do not spit.
It feels a bit unnatural, but instead of spitting, just lean over the sink, open your mouth, and let everything gently fall out. This simple trick is one of the best ways to protect that fragile blood clot that’s so essential for healing.
After the first 24 hours are up, you can start doing gentle saltwater rinses.
- The Right Mix: Just dissolve half a teaspoon of salt in a glass of warm water.
- The Gentle Technique: Swish it around your mouth very gently, especially after you eat. This will help clear out any food particles without disrupting the site.
- What to Avoid: Stay away from any mouthwash containing alcohol for at least the first week. Alcohol can be really harsh on healing tissues and might actually slow down your recovery.
What Should a Healing Tooth Extraction Site Look Like?
It’s natural to peek at the extraction site and worry about what you’re seeing, but most of the changes are a normal part of the healing playbook. Right after the procedure, the socket will be filled with a dark red blood clot—think of this as the foundation for all the new tissue to come.
Over the next week or so, you'll see your body start to replace that clot with something called granulation tissue. This new tissue often has a whitish or yellowish-gray appearance. I can't tell you how many calls we get from patients worried about this, but it’s actually a fantastic sign of healthy healing. It is not pus or an infection.
From there, the gums will slowly start to creep over the socket, a process that can take a few weeks to complete. The main thing you're watching for is an empty-looking socket, or if you can see something that looks like bare, white bone. If you see that, especially if it’s combined with significant pain, it could be a dry socket. Time to call the dentist.
Is It Normal for My Stitches to Fall Out?
Yes, if your dentist used dissolvable stitches, it's completely normal for them to fall out on their own. They are designed to do just that, usually breaking down within one to two weeks as your gums heal.
Don’t panic if a stitch comes out a few days ahead of schedule. As long as the bleeding has stopped and your pain is under control, it’s rarely an issue. The stitches do their most important job in those first few critical days.
Of course, if you have non-dissolvable stitches, your dentist will have you come back in to have them removed. If you’re ever unsure what kind you have or if something just doesn't feel right, a quick phone call to your dentist’s office can clear things up right away. For a deeper dive into these topics, check out our detailed guide on recovery FAQs.
At Specialty Wound Care, we know that sometimes healing doesn't go according to plan, especially when complicated by other health issues. If your tooth extraction site is failing to heal properly, our team is equipped with the advanced tools and proven protocols to help. Find out how we can support your healing journey at https://specialtywoundcare.com.