
A Definitive Guide to the Best Treatment for Pressure Ulcers
Finding the best treatment for pressure ulcers isn’t about a single magic bullet. It’s a coordinated strategy, kicking off with one non-negotiable step: getting the pressure off. From there, it’s all about an accurate assessment of the wound’s stage, combining consistent offloading, proper cleansing, and stage-specific care to give the body a fighting chance to heal.
The Foundation of Healing: Pressure Ulcer Assessment
Think of a pressure ulcer like a distressed patch of land. Before you can hope to restore it, you have to survey the damage. Is it just the topsoil that’s eroded, or has the problem reached all the way down to the bedrock? This initial investigation is the single most critical step. It sets the entire course for treatment.
Pressure ulcers (often called bedsores) form when constant pressure cuts off blood flow to the skin, causing the tissue to die. This is often made worse by friction and shear—think of skin rubbing against sheets or sliding down in a bed. If you don’t address the number one cause of pressure ulcers, no treatment in the world will work.
Decoding the Damage: The Staging System
Clinicians use a staging system to classify just how severe a pressure ulcer is. This isn’t just medical jargon; it’s a universal language that tells the entire care team what they’re up against and guides the whole treatment plan. Each stage signals a deeper level of tissue damage.
- Stage 1: This is the earliest warning sign. The skin is still intact but shows a persistent area of red, non-blanchable skin (meaning it doesn’t turn white when you press on it).
- Stage 2: Now we have partial-thickness skin loss. It might look like a shallow, open crater, a blister filled with clear fluid, or a simple abrasion.
- Stage 3: The damage has gone deeper, extending through the skin into the fatty tissue below. It looks like a deep crater, but you can’t see muscle, tendon, or bone yet.
- Stage 4: The most severe stage. Here, there’s full-thickness tissue loss, and muscle, tendon, or even bone is exposed. These wounds are complex and carry a serious risk of infection.
We also have two other important classifications: Unstageable ulcers, where the wound base is hidden by dead tissue (slough or eschar), making it impossible to see the true depth, and Deep Tissue Injury (DTI), which appears as a purple or maroon patch of intact skin, signaling serious damage to the soft tissue underneath.
To help you visualize this process, here’s a quick look at the Pressure Ulcer Staging system.
Pressure Ulcer Staging at a Glance
This table breaks down the stages into what you’ll see and what your first move should be.
| Stage | Appearance | Key Action |
|---|---|---|
| Stage 1 | Intact skin with non-blanchable redness. | Relieve all pressure immediately; protect the area. |
| Stage 2 | Partial-thickness skin loss (shallow crater or blister). | Offload pressure, gently cleanse, and apply a protective dressing. |
| Stage 3 | Full-thickness skin loss into the fat layer (deep crater). | Offload, cleanse, debride if needed, and apply an absorptive dressing. |
| Stage 4 | Full-thickness loss with exposed bone, tendon, or muscle. | Immediate offloading and expert consultation; surgical intervention likely. |
| Unstageable | Base is covered by slough or eschar. | Offload and debride to reveal the true wound depth. |
| DTI | Purple or maroon area of intact skin. | Offload completely and monitor closely for rapid deterioration. |
This systematic approach, from visual check to initial action, is the bedrock of effective pressure ulcer management.
This decision tree shows how those crucial first steps flow together, moving from initial assessment to staging and, finally, to creating a smart, individualized plan.
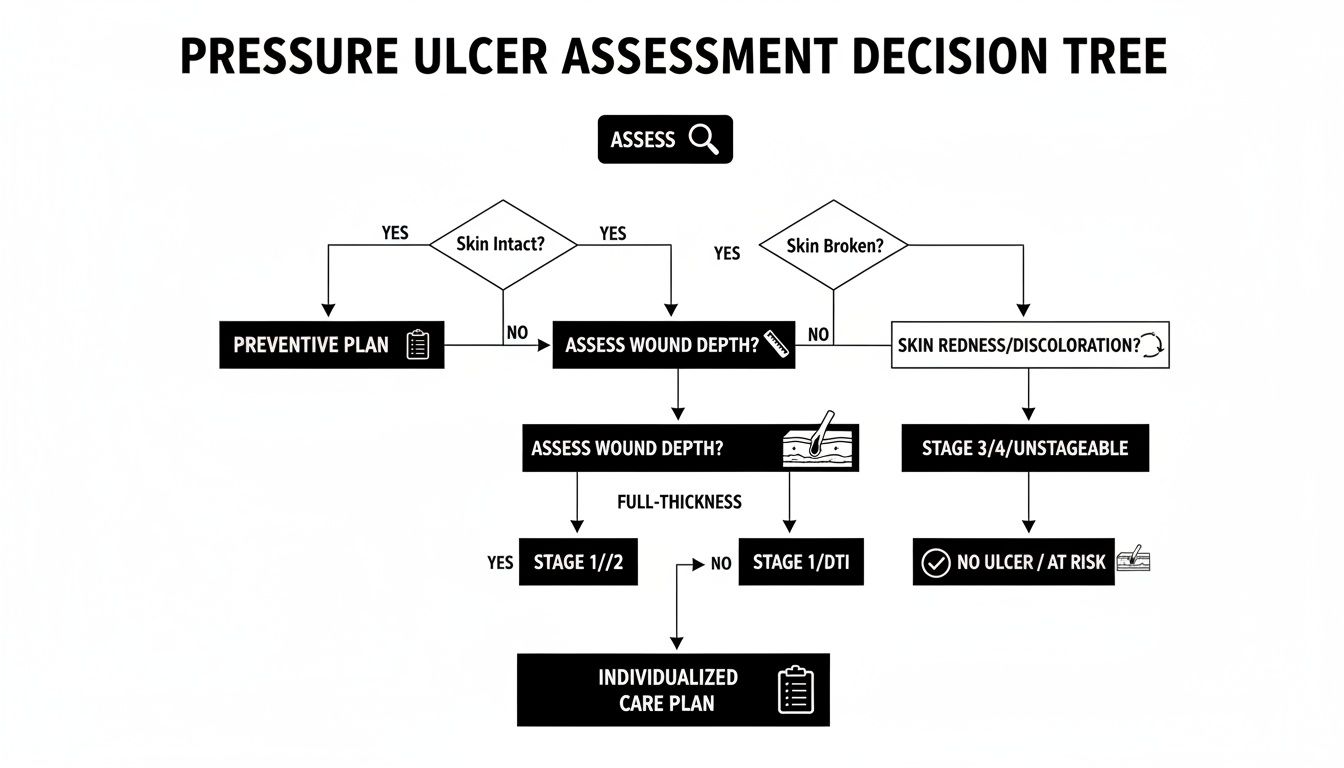
As you can see, a successful outcome isn’t about guesswork. It’s a logical, step-by-step process that hinges on getting that first evaluation right.
Your Initial Action Plan
Once you’ve identified and staged a pressure ulcer, you have to act fast to stop further damage. This immediate response is just as vital as any advanced dressing or therapy that comes later.
The core principle of pressure ulcer management is simple yet non-negotiable: you must remove the pressure. Without this fundamental step, no amount of wound care will be effective.
First, reposition the individual to completely offload the affected area. Use pillows, foam wedges, or specialized cushions to redistribute their weight and protect vulnerable bony spots like the sacrum, heels, and elbows.
Next, get a good look at the skin. Keep the area clean and dry, especially from moisture caused by incontinence. For a Stage 1 ulcer, this might be all you need to do. For open wounds, the next step is a gentle cleanse with saline before putting on a dressing that’s right for the stage. This immediate, proactive response lays the groundwork for everything that follows, giving the body the best possible shot at healing itself.
Core Principles of Pressure Ulcer Wound Care
Once you’ve staged a pressure ulcer, your focus has to shift to managing the wound itself. This isn’t just about slapping on a bandage; it’s about creating the perfect environment for the body to do what it does best—heal. The best treatment at this stage really comes down to three things: cleaning the wound gently, keeping it moist, and picking the right dressing for the specific job.
It all starts with cleaning. You need to clear out any debris or bacteria that could get in the way of healing, but you have to be gentle. Harsh antiseptics like hydrogen peroxide or iodine are a big no-no. They’re toxic to the delicate new cells trying to form and can actually “burn” the very tissue you’re trying to save.
The gold standard here is simple: sterile normal saline. It’s isotonic, which means it matches the salt concentration of our body’s fluids, so it cleans without damaging cells. The goal is to irrigate, not scrub—just enough gentle pressure to flush the wound bed without causing more trauma.
The Greenhouse Effect for Healing
After a good cleaning, the next priority is to create a moist wound environment. For years, the common wisdom was to “let it air out,” but we now know that’s one of the worst things you can do. A dry wound forms a thick scab, and new skin cells have to waste precious energy burrowing underneath it. It slows the whole process way down.
Think of a healing wound bed like a small greenhouse.
A moist, balanced environment allows new cells to glide freely across the wound surface, build new tissue, and close the gap much, much faster. Just like plants thrive in a humid greenhouse, skin cells thrive in a moist wound bed.
This environment also helps the body’s natural enzymes break down dead tissue in a process called autolytic debridement. The key word, though, is balance. The wound should be moist, not sopping wet. Too much fluid can macerate (or waterlog) the healthy skin around the wound, making it weak and prone to breaking down itself.
For anyone managing these wounds at home, getting this part right is absolutely vital. Resources like your guide to home wound care offer practical, step-by-step instructions that can make a huge difference in healing outcomes.
Choosing the Right Wound Dressing
The primary tool for maintaining that perfect greenhouse environment is the dressing. There’s no single “best” dressing for every situation. The right choice depends completely on the ulcer’s stage, depth, location, and how much fluid (exudate) it’s producing. What works for a dry Stage 2 ulcer is totally wrong for a heavily draining Stage 4 wound.
Here’s a quick look at the main categories and where they fit in:
- Foam Dressings: These are your workhorses. They’re super absorbent and provide a nice cushion, making them perfect for ulcers with moderate to heavy exudate.
- Hydrocolloids: These react with wound fluid to form a soft gel, locking in moisture. They’re best for shallow wounds with minimal to moderate drainage, like a Stage 2 or a shallow Stage 3.
- Alginates: Made from seaweed, these are incredibly absorbent. They are the go-to choice for wounds that are draining heavily or bleeding, as they form a gel that traps fluid and bacteria.
- Hydrogels: These are water or glycerin-based dressings designed to donate moisture to a dry wound bed. They’re ideal for dry ulcers that need rehydration to kickstart the healing process.
Picking a dressing isn’t a one-and-done decision. A wound’s needs change as it heals. It might start out needing an alginate for heavy drainage, but as it improves, a foam or hydrocolloid might become the better choice. You have to constantly reassess to make sure the dressing is always supporting, not hindering, the path to recovery.
When a pressure ulcer just won’t heal with the basics, it’s a clear signal to bring in the heavy hitters. Think of it like a garden that isn’t responding to regular watering and sunlight. Sometimes you need specialized fertilizers or soil treatments to kickstart growth. In the same way, advanced wound care modalities give that extra push to jumpstart healing in complex or stalled wounds.

These treatments are especially crucial for patients whose underlying conditions get in the way of healing. The geriatric population—those 60 and older—accounts for roughly 50% of the global pressure ulcer treatment market. As factors like reduced mobility and thinning skin increase risk with age, the need for effective, advanced care skyrockets. The market reflects this, with U.S. revenues hitting approximately USD 2.7 billion in a recent year, showing just how many resources are dedicated to tackling these challenging wounds.
Clearing the Way with Debridement
Before new, healthy tissue can form, you have to get rid of the old, dead stuff. This process is called debridement, and it’s a lot like weeding a garden before you plant new seeds. Dead tissue—either slough (the yellow, stringy stuff) or eschar (thick, black, leathery tissue)—is a breeding ground for bacteria and creates a physical barrier that stops healthy cells from moving in.
There are a few ways to get this done, each with its own place in the toolkit:
- Autolytic Debridement: This is the body’s own natural process. By keeping the wound moist with the right dressing, we let the body’s enzymes do the work of breaking down dead tissue. It’s gentle, but slow.
- Enzymatic Debridement: Here, we apply a topical ointment containing enzymes that specifically dissolve non-viable tissue, leaving the healthy tissue alone.
- Sharp Debridement: A trained clinician uses sterile tools like scalpels or forceps to precisely cut away the dead tissue. It’s fast, effective, and often done right at the bedside.
- Mechanical Debridement: This is an older method that uses physical force, like wet-to-dry dressings or high-pressure irrigation, to remove debris. It’s less favored now because it can be non-selective and damage healthy granulation tissue.
No matter the method, the goal is always the same: create a clean, healthy wound bed so the body can get back to the business of healing.
Negative Pressure Wound Therapy (NPWT)
One of the most powerful advanced treatments in our arsenal is Negative Pressure Wound Therapy (NPWT), often just called a wound vac. Picture a tiny, gentle vacuum working on the wound 24/7. A special foam dressing is placed inside the wound bed, sealed with a clear film, and hooked up to a small, portable pump.
NPWT works by creating a controlled, sub-atmospheric pressure environment. This gentle suction pulls excess fluid and infectious material from the wound, reduces swelling, and promotes the formation of new, healthy granulation tissue.
This therapy essentially pulls the edges of the wound together on a microscopic level, which stimulates circulation and encourages much faster closure. It’s a fantastic option for deep Stage 3 and Stage 4 ulcers, especially those with heavy drainage that need a major boost to get healing on track.
Fueling Healing with Oxygen and Biologics
For the most stubborn wounds that resist other treatments, we sometimes need to intervene at the cellular level. These advanced options provide the essential building blocks that a compromised body may be struggling to supply on its own.
To make an informed choice, it helps to see how these therapies stack up against each other. Each has a specific role and set of considerations for the patient.
Comparing Advanced Treatment Options
| Treatment | Best For | Mechanism | Consideration |
|---|---|---|---|
| Hyperbaric Oxygen | Wounds with poor blood flow, persistent infections, or stalled healing. | Increases oxygen saturation in the blood, which fuels cell repair, fights anaerobic bacteria, and reduces swelling. | Requires multiple sessions in a specialized chamber; patient must be able to tolerate pressure changes. |
| Biologics/Allografts | Large, deep wounds (Stage 3/4) or non-healing ulcers that need a structural foundation for new tissue. | Provides a scaffold for the patient’s cells to migrate into and rebuild tissue. Can also deliver growth factors. | Can be costly; requires a clean, well-prepared wound bed for successful application. |
| NPWT | Deep wounds with heavy exudate, post-surgical wounds, or traumatic injuries. | Removes fluid, reduces edema, increases blood flow, and promotes granulation tissue formation through suction. | Requires consistent power source and dressing changes every 48-72 hours; not for use on necrotic tissue. |
Ultimately, the right advanced therapy depends entirely on the specific wound, the patient’s overall health, and the clinical goals.
For wounds that just won’t close, advanced options like wound oxygen therapy can make a world of difference. In hyperbaric oxygen therapy (HBOT), the patient breathes pure oxygen inside a pressurized chamber. This floods the bloodstream with oxygen, supercharging the body’s natural healing powers and helping to knock out tough infections.
Another powerful tool is the use of biologics or skin substitutes. These are advanced dressings and grafts derived from sources like amniotic membranes or engineered tissues. They act as a scaffold, giving the patient’s own cells a framework to grow on and rebuild the damaged area. This is often the best path forward for pressure ulcers that are extremely large, deep, and have failed to respond to every other type of care. These therapies represent the pinnacle of modern wound care, offering real hope for even the most difficult cases.
The Crucial Role of Support Surfaces and Offloading
No matter how sophisticated your dressings or therapies are, they’re all destined to fail if you don’t address the root cause of a pressure ulcer: unrelenting pressure.
Think of it like trying to patch a hole in a tire while the car is still moving—it’s an exercise in futility. That’s why offloading, the deliberate act of removing pressure from the wound, isn’t just part of the plan; it is the plan.
When pressure over a bony spot becomes greater than the pressure inside the capillaries, blood flow grinds to a halt. Cut off from oxygen and nutrients, the tissue begins to die, and an ulcer forms. Offloading is what gets the blood flowing again, finally giving the body a fighting chance to heal.
Given the high cost and debilitating nature of these wounds, it’s no surprise that the global pressure ulcer treatment market was valued at around USD 6.7 billion and continues to grow. You can learn more about the growing pressure ulcer treatment market and the demand for effective solutions.
Choosing the Right Support Surface
For anyone at risk, the bed or chair they use transforms from a piece of furniture into a critical medical device. These are known as support surfaces, and their entire purpose is to redistribute pressure away from those vulnerable, bony areas. They generally fall into two main categories.
- Static Surfaces: These are your non-powered options, like high-density foam or gel mattresses and cushions. They work by allowing the body to sink in just enough to spread the weight over a much larger surface area. They’re a solid choice for individuals who can still shift their own weight and are at a moderate risk.
- Dynamic Surfaces: These are powered systems, with the most common being alternating pressure air mattresses (APAM). These mattresses contain air cells that inflate and deflate on a timer, constantly shifting the points of pressure so no single spot bears the load for too long. They are absolutely essential for people with very limited mobility or those who already have deep tissue injuries.
A high-tech surface is a powerful tool, but it’s not a substitute for repositioning. It helps minimize tissue damage between turns, but a consistent turning schedule remains the cornerstone of pressure management.
The right choice always comes down to a thorough risk assessment. You can dive deeper into when to consider offloading techniques in our detailed guide on the topic.
Beyond the Bed: Repositioning and Shear Prevention
True offloading goes far beyond the mattress. For anyone who spends significant time in a wheelchair, a specialized pressure-redistributing cushion is non-negotiable. But the most important tool is one that requires no technology at all: a consistent, documented repositioning schedule.
A standard, evidence-based guideline is the two-hour turning rule for anyone confined to a bed. For those in a chair, it’s even more frequent—pressure relief should happen every 15 to 30 minutes.
It’s also vital to protect the skin from friction and shear during every move. Shear is that damaging force that occurs when the skin is pulled in one direction while the bones beneath it move in another, stretching and tearing tiny blood vessels.
Here’s how to prevent it:
- Use lifting devices or draw sheets to move individuals. Never drag them across the bed.
- Keep the head of the bed elevated no more than 30 degrees unless medically necessary. A higher angle causes the body to slide down, creating significant shear forces on the sacrum.
- Use pillows or foam wedges to support the body in a side-lying position. This simple step keeps bony prominences like the ankles and knees from pressing against each other.
Managing Nutrition and Complications
You can have the most advanced dressing and a perfect care plan, but a pressure ulcer simply won’t heal if the patient’s body doesn’t have the fuel to rebuild. Effective treatment is as much about what you put into the body as what you put on the wound.
Think of it like trying to build a house. You can have the best crew and blueprints, but if the supply trucks don’t deliver bricks, lumber, and mortar, the project is dead in the water. Healing is a construction project on a cellular level, and nutrients are the raw materials. Without them, everything grinds to a halt.

Fueling the Healing Process
A nutritional assessment isn’t optional; it’s a cornerstone of any serious wound care strategy. We need to make sure the body has a surplus of specific building blocks to mend itself from the inside out.
Here are the non-negotiables:
- Protein: This is the absolute foundation of tissue repair. Protein provides the amino acids needed to construct new skin, collagen, and blood vessels. Skimp on protein, and you’re setting the wound up for failure.
- Calories: Healing is hard work and burns a ton of energy. Adequate caloric intake is crucial so the body can use precious protein for rebuilding tissue instead of just burning it to keep the lights on.
- Vitamin C: Think of this as the mortar that holds the cellular bricks together. It’s essential for synthesizing collagen, which gives new tissue its strength and integrity.
- Vitamin A: This nutrient is a key player in managing the inflammatory response and kickstarting the growth of new skin cells (a process called epithelialization).
- Zinc: A critical mineral that acts as a catalyst, helping the enzymes responsible for cell growth and tissue repair do their jobs effectively.
Understanding how malnutrition contributes to pressure injury risk is fundamental. It directly connects what a patient eats to their body’s ability to defend itself and heal.
Recognizing and Managing Wound Infection
Even with a perfect diet, complications can throw a wrench in the works. An infected pressure ulcer is a serious red flag that demands immediate action before it escalates into a systemic problem.
An infection happens when harmful bacteria take over the wound, overwhelming the body’s natural defenses. Learning to spot the early warning signs is one of the most important skills in wound management.
Keep a sharp eye out for these classic signs of a localized infection:
- Increased pain or new tenderness at the wound site
- Redness that spreads out from the wound, often with warmth
- A foul odor that wasn’t there before
- Purulent drainage (thick, cloudy, or discolored pus)
- New or worsening swelling around the ulcer
If you see these signs—especially if the patient also has a fever or chills—it’s time for an urgent medical evaluation. Treatment typically involves wound cultures to identify the culprit bacteria and systemic antibiotics to attack the infection from within. This kind of proactive management is a major reason why pressure ulcer mortality rates, while still a concern, have seen a modest but steady decline over the last 30 years. These global trends in wound care show how much progress has been made through improved clinical practices.
Prevention: The Ultimate Pressure Ulcer Treatment
After diving deep into the complexities of treating pressure ulcers, we land on the most fundamental truth in wound care: the best treatment is preventing them in the first place. While all the advanced therapies we’ve discussed are invaluable, they’re reactive. A proactive, consistent prevention strategy is always the more effective—and compassionate—approach.
Think of it like maintaining the roof on your house. It’s far smarter to do regular inspections and fix a few loose shingles than to wait for a massive leak to ruin your home’s structure. In the same way, a dedicated prevention protocol protects the skin’s integrity before the first hint of breakdown appears.
Identifying At-Risk Individuals
The first step in any solid prevention plan is figuring out who is most vulnerable. This isn’t a guessing game; we use validated, systematic tools to assess risk. One of the most common and trusted is the Braden Scale, which scores six key risk factors.
- Sensory Perception: Can the person feel and respond to pain or pressure-related discomfort?
- Moisture: How often is the skin exposed to moisture from things like sweat or incontinence?
- Activity: How much is the individual moving around physically?
- Mobility: Can they change and control their body position on their own?
- Nutrition: What does their typical daily food intake look like?
- Friction and Shear: Is there a risk of skin being pulled or rubbed against surfaces?
A lower score on the Braden Scale means a higher risk, which should immediately trigger a more intensive prevention plan. This simple assessment gives us a clear roadmap to build an individualized care strategy right from the start.
Building a Proactive Defense
Once you’ve identified the risk, it’s time to build a multi-faceted defense. This isn’t about a single action but a series of consistent habits woven into the daily care routine. The goal is to tackle every potential cause of skin breakdown before it even has a chance to become a problem.
Prevention isn’t a task to check off a list; it’s a mindset to adopt. Every single interaction, from repositioning a patient to helping with a meal, is an opportunity to protect vulnerable skin and bolster the body’s natural defenses.
Key prevention strategies include:
- Systematic Skin Inspections: Get in the habit of performing daily, head-to-toe skin checks. Pay extra attention to bony hotspots like the sacrum, heels, hips, and elbows. Look for any redness or discoloration that doesn’t disappear when you press on it.
- Moisture Management: Skin needs to be kept clean and dry. Use barrier creams to shield the skin from incontinence, and make sure bedding is changed immediately if it gets damp.
- Optimized Nutrition and Hydration: From day one, focus on a diet rich in protein, calories, vitamins, and minerals. Proper hydration is just as crucial, as it keeps the skin supple and more resilient to damage.
- Promoting Mobility: Encourage as much movement as possible, even if it’s just small shifts in position. For individuals who can’t move on their own, a strict and documented repositioning schedule is non-negotiable.
Answering Your Questions About Pressure Ulcer Care
When you or a loved one is dealing with a pressure ulcer, a lot of questions come up. It’s completely normal. Let’s walk through some of the most common concerns to give you clear, practical answers and help you feel more confident in the healing journey.
How Long Does It Take for a Pressure Ulcer to Heal?
This is probably the number one question we hear, and the honest answer is: it depends. The healing timeline is incredibly varied, hinging on the ulcer’s stage, the person’s overall health, and how closely the treatment plan is followed. A Stage 1 ulcer, for instance, might clear up in just a few days once pressure is removed.
On the other hand, a deep Stage 4 ulcer is a much longer road. We’re often talking months, sometimes even years, and surgical help might be necessary. The single most important factor for speeding things up is sticking to the care plan, day in and day out.
Can a Pressure Ulcer Heal Without a Special Dressing?
It’s a tempting thought, but for most wounds, it’s not a safe bet. While a very minor Stage 1 sore might resolve on its own by simply getting pressure off the area, anything from Stage 2 onward absolutely needs a dressing to heal properly.
Dressings do several critical jobs:
- Protect the Wound: They act as a shield, keeping bacteria and other contaminants out.
- Balance Moisture: A properly moist environment is a non-negotiable for new, healthy cells to grow.
- Manage Drainage: They pull excess fluid away from the wound, which prevents it from damaging the healthy skin nearby.
The right dressing is always chosen based on what the wound needs at that moment—how much it’s draining, whether there’s dead tissue, and other factors.
When Should I See a Doctor for a Pressure Ulcer?
The simple answer? Immediately. You should get in touch with a healthcare professional the moment you suspect a pressure ulcer, even if it just looks like a Stage 1 red spot. Early intervention is the absolute key to stopping a small problem from becoming a big one—it’s the foundation of the best treatment for pressure ulcers.
You must seek immediate medical help if you see any signs of infection, like a fever, pus, a foul smell, or redness that’s spreading. Worsening pain or a wound that’s getting bigger are also red flags.
For any ulcer that reaches Stage 3 or Stage 4, a specialized wound care team isn’t just a good idea; it’s essential for managing the wound’s complexity and getting a good outcome.
At Specialty Wound Care, we pair advanced diagnostic tools with proven therapies to build personalized healing plans for even the most difficult wounds. Find out how our expert team can support your recovery by visiting us at Specialtywoundcare.com.
Article created using Outrank